Sunday, August 26, 2012

Macaroni and Cheese Bites


My parents had a date night last night, so I was in charge of making dinner for my younger siblings and myself.  We had some leftover macaroni and cheese (the Publix version of Kraft Deluxe, 'cause it tastes the same and it's cheaper) from the day before when my brother had a friend over (Apparently, picky 10-year-old boys only eat chicken nuggets and macaroni and cheese from a box.  Not that I'm complaining; I happen to love boxed macaroni and cheese.  But I'm not really fond of chopped-and-formed chicken nuggets that all have identically irregular shapes.  I mean, really, why bother trying to make them look lumpy if they all have the exact same bump and dent on one side?).  My mom mentioned that she had seen mini macaroni and cheese bites on Pinterest and she thought we might like to have those for dinner.  Of course, all three of us were super excited, pasta-and-cheese-loving people that we are.  But when Mommy pulled up the recipe for me to follow, it required making macaroni and cheese from scratch, which defeated the point of re-purposing our leftovers.  So...I winged it.  (Wang it?  Wung it?  I have yet to figure out what the past tense of "wing it" is.)  As a result, the following recipe will not have any precise measurements, only estimates.  If you would like to make macaroni and cheese bites, feel free to use this as a guideline or a jumping-off point and adapt everything to suit your preferences.  The inspiration for this recipe can be found here.


Macaroni and Cheese Bites
Juniper's Table Original, inspired by Macaroni and Cheesecake

Ingredients (all measurements are approximations):
4 cups of leftover prepared macaroni and cheese (I warmed it in the microwave for a little bit just to make it easier to stir.)
1/2 cup shredded sharp cheddar cheese
1 large egg
A healthy splash (3 or 4 tablespoons, maybe?) of half-and-half (heavy cream would work, too, or even just milk)
Garlic powder, paprika, and dry mustard powder to taste (I just sprinkled until it looked right--I learned from my Mommy!)
For Topping:
Dry seasoned breadcrumbs
Melted butter

Instructions:

Preheat the oven to 425° F.  Grease a non-stick mini muffin tin with cooking spray (or butter, if, like me, you're feeling rebellious) and set aside.

Place the macaroni and cheese and shredded cheddar in a large mixing bowl.  In a small bowl, beat the egg with the half-and-half.  Pour the egg mixture over the macaroni and cheese and stir to combine.  Sprinkle in the garlic powder, paprika, and dry mustard powder until you reach your preferred level of deliciousness, then stir again to thoroughly mix all ingredients.

Spoon the macaroni and cheese mixture into the mini muffin tin, distributing it evenly and gently packing it down into the cups.  Mix some seasoned breadcrumbs with a little melted butter and evenly sprinkle over the macaroni and cheese.

Bake the macaroni and cheese bites until they are set and become golden brown on top, about 10 to 15 minutes.  Remove the pan from the oven and let the bites cool for 5 minutes before removing from the pan and devouring.

Yield: 24 mini macaroni and cheese bites


Sunday, August 5, 2012

English Muffins, Part 3

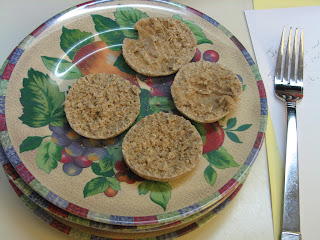
The verdict: homemade English muffins make a lovely, tasty breakfast, whether toasted or untoasted, buttered or jammed.  I will definitely be making more English muffins soon.  But not too soon, since I learned this morning that my little brother doesn't like English muffins unless they are piled with an inch-thick layer of lemon curd or chocolate cream cheese.  Oh, well.  You can't please everyone all the time, right?

Look at my teeny tiny English muffins! :)


Buttermilk English Muffins
Recipe found HERE

Makes about 8-10 muffins [or 17 2 1//2-inch mini-muffins, in my case]

Ingredients:

1 cup whole wheat flour
1 cup all-purpose flour
2 teaspoons active dry yeast
1 teaspoon salt
3/4 teaspoon baking soda
3/4 cup reduced fat buttermilk
1-2 tablespoons water [I only used 1 tablespoon of water]
Extra Flour and cornmeal for dusting
Cooking oil [I used canola oil]

Instructions:

In a large bowl, combine the whole wheat flour, all-purpose flour, active dry yeast, salt, and baking soda, and mix well.  Add buttermilk and water and mix with a wooden spoon until liquids are incorporated and start forming a dough.  On a lightly floured surface, knead the dough until smooth, soft, and pliable.  (If the dough is too wet, add a little bit of flour.  But be careful not to add too much, or the dough will be too tough.)  [I didn't add any extra flour.]  Transfer the dough to a bowl, cover, and let it rise at the room temperature for 1 to 1 1/2 hours or until the dough doubles in size.

Prepare a couple of flat plates and sprinkle some cornmeal [I used two wooden pizza peels].  On a lightly floured surface, roll out the dough to about 1/4 to 1/3 inch thick.  Cut out the rounds using a 3-inch round cookie cutter.  Place the cut our pieces on the plates.  (Avoid working too much with the dough, or it will get tough.)  You can gather the leftover scrap pieces and combine together, but you shouldn't do this more than once.  Sprinkle some cornmeal on the tops of the dough rounds and let them rest for about 50 minutes.

Brush a large flat skillet with cooking oil.  Heat the skillet over medium.  When the pan gets hot, place 4-5 muffins (or however many fit without touching each other) and cook for 4-5 minutes or until golden brown.  (Try checking the bottoms every couple of minutes and adjust the heat accordingly.)  Flip the muffins to the other side and repeat the procedure.  Cook both sides for another 2 minutes each.  [Mine only took about 2 minutes total per side.]  Remove from heat and let them cool.  Repeat the same procedure to finish cooking them all.

*NOTE: The English muffins may be placed in a zip-lock storage bag after they have cooled for overnight storage.  I suggest placing the bag in the refrigerator if they will be stored any longer than overnight.

Split open and ready for toasting!

Saturday, August 4, 2012

English Muffins, Part 2


The pretty, first-cut English muffins.


After the dough doubled, I rolled it out about a quarter of an inch thick and cut out my English muffins.  I re-rolled the scraps once and cut a few more, then formed two wonky-shaped muffins with the final scraps.  The cornmeal-dusted dough rounds went for a 50-minute rest in the warm garage before coming back in the house to be cooked.

The two wonky-shaped muffins are on this pizza peel, post-rising.


I say "cooked" rather than "baked" because English muffins are prepared in a pan on the stove top.  A lightly greased griddle over medium heat is all you need to "bake" your English muffins.  Actually, I heated my pan over medium heat but ended up having to keep it turned down to medium-low so my muffins wouldn't burn.  Also, the recipe said they would take 4-5 minutes per side, but 2 minutes was just about perfect for my English muffins.  This might be due to their smaller size, though; I was once again faced with the wrong-sized-cookie-cutter dilemma.  I had to use a 2 1/2-inch cutter instead of a 3-inch cutter, the result being adorable mini English muffins!  Tomorrow we'll taste-test them for breakfast.


Flip, little English muffin, flip!


The finished English muffins, waiting to be devoured for breakfast! :)

English Muffins, Part 1

I'm making English muffins this evening!  We have a half gallon of buttermilk in the fridge that needs to be used up, so when I went searching for recipes, I made sure to pick one that used buttermilk.  Out of the few recipes I found, I decided on the one with the shortest ingredient list and instructions (since I'm certain that shortness = easiness), and it just so happens that this particular recipe uses whole wheat and all-purpose flour.  Yay for unintentional health benefits! :)


I mixed and kneaded the dough and I just set it in the garage to rise.  Our garage gets very warm, especially in the summer, so it's the perfect place for bread to rise.  In about an hour I'll go check on the dough to see if it has doubled.