Oh hi!...
...
...
*Awkward silence*
...
...
...So...
...Yeah...
...Um...
...
...
...I'm back! For now at least. Until I decide again that it is way too much work to blog...
*Ahem* So, I just wanted to pop in and type up the "recipe" for the sandwiches we had for lunch today. I probably shouldn't even call it a recipe, since I didn't measure anything, but whatever.
You know how you read about tea parties and they always have those tiny crustless tea sandwiches? The ones with fancy chicken salad or watercress? Or maybe you've heard of the cucumber kind? Yeah, that's what my lunch was today. Not the fancy chicken or the watercress--the cucumber kind. Except that my sandwich was, like, three zillion times bigger than those tiny triangles that people eat at tea parties. Also, it was three zillion times more delicious.
Cucumber Sandwiches
A Juniper's Table original recipe!
Ingredients:
Cream cheese, softened (I used a little less than a whole 8-oz. package)
Mayonnaise (Maybe a couple tablespoons?)
Garlic powder (A generous sprinkle)
Salt (Not too much, just a pinch)
Dried dill (fresh would be even better!)
Cucumber, thinly sliced and patted dry (I used almost one whole cucumber, seeds removed)
Good-quality white sandwich bread (Make sure it is not sliced too thickly! You can remove the crusts if you like, but I left them on. That's where all the vitamins are, right?)
Instructions:
Place the cream cheese in a bowl. Squirt in the mayonnaise and stir the two together until smooth. Sprinkle in the garlic powder, salt, and dried (or fresh!) dill to taste. Stir again and sample to be sure it tastes right. Spread a relatively thin layer of the cream cheese mixture on one side of each slice of bread. Layer the thinly sliced cucumber over the cream cheese on one piece of bread, then slap another piece of bread on top, cream cheese side down. Lightly press together, cut into four triangles, and enjoy!
*Note: These would probably be even better if you made the cream cheese mixture ahead of time and gave it a chance for the flavors to meld. If you use fresh dill, be sure to chop it finely. I used almost one whole cucumber and all of the cream cheese on three and a half sandwiches, but the yield depends on how thickly you spread/layer your ingredients.
Wednesday, October 17, 2012
Sunday, August 26, 2012
Macaroni and Cheese Bites
My parents had a date night last night, so I was in charge of making dinner for my younger siblings and myself. We had some leftover macaroni and cheese (the Publix version of Kraft Deluxe, 'cause it tastes the same and it's cheaper) from the day before when my brother had a friend over (Apparently, picky 10-year-old boys only eat chicken nuggets and macaroni and cheese from a box. Not that I'm complaining; I happen to love boxed macaroni and cheese. But I'm not really fond of chopped-and-formed chicken nuggets that all have identically irregular shapes. I mean, really, why bother trying to make them look lumpy if they all have the exact same bump and dent on one side?). My mom mentioned that she had seen mini macaroni and cheese bites on Pinterest and she thought we might like to have those for dinner. Of course, all three of us were super excited, pasta-and-cheese-loving people that we are. But when Mommy pulled up the recipe for me to follow, it required making macaroni and cheese from scratch, which defeated the point of re-purposing our leftovers. So...I winged it. (Wang it? Wung it? I have yet to figure out what the past tense of "wing it" is.) As a result, the following recipe will not have any precise measurements, only estimates. If you would like to make macaroni and cheese bites, feel free to use this as a guideline or a jumping-off point and adapt everything to suit your preferences. The inspiration for this recipe can be found here.

Macaroni and Cheese Bites
Juniper's Table Original, inspired by Macaroni and Cheesecake
Ingredients (all measurements are approximations):
4 cups of leftover prepared macaroni and cheese (I warmed it in the microwave for a little bit just to make it easier to stir.)
1/2 cup shredded sharp cheddar cheese
1 large egg
A healthy splash (3 or 4 tablespoons, maybe?) of half-and-half (heavy cream would work, too, or even just milk)
Garlic powder, paprika, and dry mustard powder to taste (I just sprinkled until it looked right--I learned from my Mommy!)
For Topping:
Dry seasoned breadcrumbs
Melted butter
Instructions:
Preheat the oven to 425° F. Grease a non-stick mini muffin tin with cooking spray (or butter, if, like me, you're feeling rebellious) and set aside.
Place the macaroni and cheese and shredded cheddar in a large mixing bowl. In a small bowl, beat the egg with the half-and-half. Pour the egg mixture over the macaroni and cheese and stir to combine. Sprinkle in the garlic powder, paprika, and dry mustard powder until you reach your preferred level of deliciousness, then stir again to thoroughly mix all ingredients.
Spoon the macaroni and cheese mixture into the mini muffin tin, distributing it evenly and gently packing it down into the cups. Mix some seasoned breadcrumbs with a little melted butter and evenly sprinkle over the macaroni and cheese.
Bake the macaroni and cheese bites until they are set and become golden brown on top, about 10 to 15 minutes. Remove the pan from the oven and let the bites cool for 5 minutes before removing from the pan and devouring.
Yield: 24 mini macaroni and cheese bites

Sunday, August 5, 2012
English Muffins, Part 3
The verdict: homemade English muffins make a lovely, tasty breakfast, whether toasted or untoasted, buttered or jammed. I will definitely be making more English muffins soon. But not too soon, since I learned this morning that my little brother doesn't like English muffins unless they are piled with an inch-thick layer of lemon curd or chocolate cream cheese. Oh, well. You can't please everyone all the time, right?
Buttermilk English Muffins
Recipe found HERE
Makes about 8-10 muffins [or 17 2 1//2-inch mini-muffins, in my case]
Ingredients:
1 cup whole wheat flour
1 cup all-purpose flour
2 teaspoons active dry yeast
1 teaspoon salt
3/4 teaspoon baking soda
3/4 cup reduced fat buttermilk
1-2 tablespoons water [I only used 1 tablespoon of water]
Extra Flour and cornmeal for dusting
Cooking oil [I used canola oil]
Instructions:
In a large bowl, combine the whole wheat flour, all-purpose flour, active dry yeast, salt, and baking soda, and mix well. Add buttermilk and water and mix with a wooden spoon until liquids are incorporated and start forming a dough. On a lightly floured surface, knead the dough until smooth, soft, and pliable. (If the dough is too wet, add a little bit of flour. But be careful not to add too much, or the dough will be too tough.) [I didn't add any extra flour.] Transfer the dough to a bowl, cover, and let it rise at the room temperature for 1 to 1 1/2 hours or until the dough doubles in size.
Prepare a couple of flat plates and sprinkle some cornmeal [I used two wooden pizza peels]. On a lightly floured surface, roll out the dough to about 1/4 to 1/3 inch thick. Cut out the rounds using a 3-inch round cookie cutter. Place the cut our pieces on the plates. (Avoid working too much with the dough, or it will get tough.) You can gather the leftover scrap pieces and combine together, but you shouldn't do this more than once. Sprinkle some cornmeal on the tops of the dough rounds and let them rest for about 50 minutes.
Brush a large flat skillet with cooking oil. Heat the skillet over medium. When the pan gets hot, place 4-5 muffins (or however many fit without touching each other) and cook for 4-5 minutes or until golden brown. (Try checking the bottoms every couple of minutes and adjust the heat accordingly.) Flip the muffins to the other side and repeat the procedure. Cook both sides for another 2 minutes each. [Mine only took about 2 minutes total per side.] Remove from heat and let them cool. Repeat the same procedure to finish cooking them all.
 |
| Look at my teeny tiny English muffins! :) |
Buttermilk English Muffins
Recipe found HERE
Makes about 8-10 muffins [or 17 2 1//2-inch mini-muffins, in my case]
Ingredients:
1 cup whole wheat flour
1 cup all-purpose flour
2 teaspoons active dry yeast
1 teaspoon salt
3/4 teaspoon baking soda
3/4 cup reduced fat buttermilk
1-2 tablespoons water [I only used 1 tablespoon of water]
Extra Flour and cornmeal for dusting
Cooking oil [I used canola oil]
Instructions:
In a large bowl, combine the whole wheat flour, all-purpose flour, active dry yeast, salt, and baking soda, and mix well. Add buttermilk and water and mix with a wooden spoon until liquids are incorporated and start forming a dough. On a lightly floured surface, knead the dough until smooth, soft, and pliable. (If the dough is too wet, add a little bit of flour. But be careful not to add too much, or the dough will be too tough.) [I didn't add any extra flour.] Transfer the dough to a bowl, cover, and let it rise at the room temperature for 1 to 1 1/2 hours or until the dough doubles in size.
Prepare a couple of flat plates and sprinkle some cornmeal [I used two wooden pizza peels]. On a lightly floured surface, roll out the dough to about 1/4 to 1/3 inch thick. Cut out the rounds using a 3-inch round cookie cutter. Place the cut our pieces on the plates. (Avoid working too much with the dough, or it will get tough.) You can gather the leftover scrap pieces and combine together, but you shouldn't do this more than once. Sprinkle some cornmeal on the tops of the dough rounds and let them rest for about 50 minutes.
Brush a large flat skillet with cooking oil. Heat the skillet over medium. When the pan gets hot, place 4-5 muffins (or however many fit without touching each other) and cook for 4-5 minutes or until golden brown. (Try checking the bottoms every couple of minutes and adjust the heat accordingly.) Flip the muffins to the other side and repeat the procedure. Cook both sides for another 2 minutes each. [Mine only took about 2 minutes total per side.] Remove from heat and let them cool. Repeat the same procedure to finish cooking them all.
*NOTE: The English muffins may be placed in a zip-lock storage bag after they have cooled for overnight storage. I suggest placing the bag in the refrigerator if they will be stored any longer than overnight.
 |
| Split open and ready for toasting! |
Saturday, August 4, 2012
English Muffins, Part 2

 |
| The pretty, first-cut English muffins. |
After the dough doubled, I rolled it out about a quarter of an inch thick and cut out my English muffins. I re-rolled the scraps once and cut a few more, then formed two wonky-shaped muffins with the final scraps. The cornmeal-dusted dough rounds went for a 50-minute rest in the warm garage before coming back in the house to be cooked.
 |
| The two wonky-shaped muffins are on this pizza peel, post-rising. |

I say "cooked" rather than "baked" because English muffins are prepared in a pan on the stove top. A lightly greased griddle over medium heat is all you need to "bake" your English muffins. Actually, I heated my pan over medium heat but ended up having to keep it turned down to medium-low so my muffins wouldn't burn. Also, the recipe said they would take 4-5 minutes per side, but 2 minutes was just about perfect for my English muffins. This might be due to their smaller size, though; I was once again faced with the wrong-sized-cookie-cutter dilemma. I had to use a 2 1/2-inch cutter instead of a 3-inch cutter, the result being adorable mini English muffins! Tomorrow we'll taste-test them for breakfast.

 |
| Flip, little English muffin, flip! |

 |
| The finished English muffins, waiting to be devoured for breakfast! :) |
English Muffins, Part 1
I'm making English muffins this evening! We have a half gallon of buttermilk in the fridge that needs to be used up, so when I went searching for recipes, I made sure to pick one that used buttermilk. Out of the few recipes I found, I decided on the one with the shortest ingredient list and instructions (since I'm certain that shortness = easiness), and it just so happens that this particular recipe uses whole wheat and all-purpose flour. Yay for unintentional health benefits! :)


I mixed and kneaded the dough and I just set it in the garage to rise. Our garage gets very warm, especially in the summer, so it's the perfect place for bread to rise. In about an hour I'll go check on the dough to see if it has doubled.


Friday, July 13, 2012
Chocolate Cake Doughnuts
Yesterday, Daddy and I made doughnuts! I made the dough in the afternoon, and after dinner Daddy helped me fry them. To begin with, I was quite nervous about the whole pot-of-boiling-oil thing, but Daddy monitored the temperature and showed me what to do, and before long I was happily frying.
I had taken a poll throughout the house to find out what kind of doughnuts we should make, and the resounding request was for chocolate cake doughnuts. Daddy picked a recipe from the ones I found online. I mixed up the dough ahead of time, since it had to chill for at least 2 hours, and it went very well until I added the buttermilk to the other liquids--I didn't take it out of the fridge ahead of time, so when cold buttermilk met melted butter, things got a little . . . lumpy. Luckily, after the dry ingredients were combined with the wet, everything smoothed out.

After dinner, Daddy started heating the canola oil in the fryer. He used a candy thermometer to monitor the temperature of the oil instead of going by the temperature gauge on the fryer itself. This was good, since apparently the fryer cannot be trusted to report the correct temperature. While Daddy tended to our medieval torture device, I got to work with the dough. I started with about half of the dough (Daddy put the rest in the freezer to keep it chilly while we worked--it is much easier to work with when chilled!). First I floured the counter and the top of the dough, and then gently patted it out to a half-inch thickness.

We own a nifty doughnut cutter, but if you don't, you could just use the rim of a glass to cut your doughnuts. Our doughnut cutter is about 2 1/2 inches across with a removable 1-inch cutter attached in the center, so I would suggest finding a glass about the same size. You could either use your fingers to poke holes in the doughnuts, or you could use a really small round cookie cutter to cut out the centers. (By the way, doughnut holes do not take as long to fry as regular-sized doughnuts, and sometimes they flip themselves!)


When the oil was at the right temperature, I transferred the dough rounds to a large metal skimmer and lowered them completely into the oil. Our doughnuts took only a minute or two per side. We used bamboo chopsticks to flip the doughnuts in the oil and to carefully remove them when they were finished.


Daddy made the chocolate glaze in the microwave while I fried the first half of the doughnuts. The original recipe made twice as much glaze and was done on the stove, but we halved the recipe and made it in the microwave to save time, space, and dishes. The measurements below are for a half batch of glaze, and it was just enough to coat all the doughnuts (but only a few of the holes, which were delicious both plain and glazed).


After the doughnuts had drained and cooled slightly, I dipped them in the chocolate glaze. The recipe says to let them set before devouring, but I didn't want to wait that long, so we all took a doughnut break to sample them before continuing the cutting and frying process.

Now that I've conquered my fear of boiling oil, I can't wait to fry some more! I think I should try plain cake doughnuts next, and then maybe yeast doughnuts. And Mommy even encouraged me to make doughnuts again! She said that these doughnuts weren't greasy and didn't upset her stomach the way store-bought doughnuts often do. My chocolate-loving little brother adored them, of course, and Daddy (who usually doesn't like sweets) seemed to enjoy them, too. The doughnuts themselves are not overly sweet, so the glaze adds to the experience as opposed to overpowering everything with more sugary sweetness.
And one more thing: homemade doughnuts are best eaten the day they are made, but if you fry them in the evening, they still taste excellent for breakfast the next morning! :)

Chocolate Cake Doughnuts
Adapted from The Prepared Pantry
Yield: approximately 22-24 doughnuts
Ingredients:
3 1/2 cups all-purpose flour
1/3 cup cocoa powder
1 1/2 teaspoons baking powder
1 teaspoon baking soda
1/2 teaspoon salt
1 teaspoon cinnamon
3 large eggs
1 cup granulated sugar
1 teaspoon vanilla extract
6 tablespoons butter, melted
3/4 cup buttermilk
Directions:
1. In a large bowl, whisk together the flour, cocoa powder, baking powder, baking soda, salt, and cinnamon.
2. In another bowl, whisk together the eggs, sugar, vanilla, melted butter, and buttermilk.
3. In a separate bowl, alternately mix the dry ingredients and wet ingredients together, beginning with about one third of the flour, then half of the liquids, then one third of the flour, etc. until all are mixed. Do not over mix.
4. Chill the dough for a minimum of two hours.
5. Flour the dough on both sides. Working with half the dough at a time, roll or pat the dough until it is one-half inch thick. Cut into doughnut shapes with a doughnut cutter or two concentric circle cutters.
6. Deep fry the doughnuts, two or three at a time, at 365 degrees (but not below 360 degrees) for approximately 1 to 1 1/2 minutes per side.
7. Carefully remove the doughnuts from the hot oil and drain on a cooling rack placed over a paper towel-lined cookie sheet. Once slightly cooled, dip each doughnut in the chocolate glaze (recipe below).
Chocolate Glaze
Ingredients:
1/3 cup semi-sweet chocolate chips
2 tablespoons butter
1/4 cup milk
3/4 cup powdered sugar
1 teaspoon pure vanilla extract
Directions:
1. Place the chocolate chips and butter in a small, microwave-safe bowl. Microwave on high power for 30 seconds, then stir. Continue to microwave for 10-15 seconds at a time, stirring well in between, until the mixture is completely melted.
2. Whisk in the milk until the chocolate mixture is smooth, microwaving for a few more seconds if necessary.
3. Add the powdered sugar and vanilla and whisk until smooth and completely combined. The glaze should be slightly runny, but not watery. Adjust the amount of powdered sugar if necessary.
4. Dip each doughnut halfway into the glaze to coat one side. Invert onto a wire rack over waxed paper to catch the drips and allow the glaze to set before serving.
 |
| YUM! |
Wednesday, June 27, 2012
Poached Eggs
I had always thought that poached eggs were fancy and difficult to make. After my experience with poaching eggs this morning, I have come to the following conclusions:
1. Yes, poached eggs can be fancy, but they also make a simple and tasty breakfast along with some buttered toast.
and
2. No, poached eggs are not difficult to make. Slightly more time-consuming and resulting in more dirty dishes than other egg preparation methods, perhaps, but by no means is it difficult to poach an egg.
Since poaching eggs is less of a recipe and more of a method, I'm not going to include a recipe in this post. There are plenty of step-by-step egg-poaching tutorials out there and I don't think another one is needed (plus, I'm feeling lazy today and I don't want to type up a recipe).
I mainly used two sources for reference:
http://smittenkitchen.com/2008/08/how-to-poach-an-egg-smitten-kitchen-style/
http://www.pbs.org/food/fresh-tastes/poached-eggs/
 I followed the method in the second link this time, but I may try the whirlpool technique next time I poach eggs. I'm curious as to whether it would result in less weird filmy waterlogged egg white floating around the pot. I found that lowering the small dish with the egg into the water before tipping it out did seem to help keep the egg in one place.

The first egg was left in the water for about 3 minutes. Since it was the first one I made and I didn't want to give the uncertain results to my family members and possibly disappoint them, I ate the first fruits of my labors. The white was firm and smooth, but the yolk was still liquid, just the way I like it. There was a thin layer of almost-firm yolk, but it was mostly just runny and delicious with my buttered toast.

Next, I tried poaching two at once. I left them in the pot for about 3 minutes each (taking advantage of both the stove timer and the microwave timer). These two were slightly more cooked than mine, but still had runny yolks. My older sister and my little brother each had one. My little brother said it was okay, but he actually prefers a solid yolk. Next I poached two more eggs for my younger sister. She really liked them, but then again, she loves eggs in general. After hers were done, I offered to try poaching one more for my brother, this time with a solid yolk. I let it cook for close to 6 minutes, and when he cut into the yolk, it was solid almost all the way through, with a slightly soft--but definitely not runny--center. Finally, I poached an egg for my mom. In an effort to end up with minimal cooked yolk, I only let the egg cook for 2 1/2 minutes. She said it still have a layer of cooked yolk, though, so next time I might try only 2 minutes of cooking time.
All in all, I would say today's eggy experience was a success! I can't wait to try making Eggs Benedict with my new egg-poaching skills, and it will give me a chance to attempt a hollandaise sauce, as well.

1. Yes, poached eggs can be fancy, but they also make a simple and tasty breakfast along with some buttered toast.
and
2. No, poached eggs are not difficult to make. Slightly more time-consuming and resulting in more dirty dishes than other egg preparation methods, perhaps, but by no means is it difficult to poach an egg.
Since poaching eggs is less of a recipe and more of a method, I'm not going to include a recipe in this post. There are plenty of step-by-step egg-poaching tutorials out there and I don't think another one is needed (plus, I'm feeling lazy today and I don't want to type up a recipe).
I mainly used two sources for reference:
http://smittenkitchen.com/2008/08/how-to-poach-an-egg-smitten-kitchen-style/
http://www.pbs.org/food/fresh-tastes/poached-eggs/


The first egg was left in the water for about 3 minutes. Since it was the first one I made and I didn't want to give the uncertain results to my family members and possibly disappoint them, I ate the first fruits of my labors. The white was firm and smooth, but the yolk was still liquid, just the way I like it. There was a thin layer of almost-firm yolk, but it was mostly just runny and delicious with my buttered toast.

Next, I tried poaching two at once. I left them in the pot for about 3 minutes each (taking advantage of both the stove timer and the microwave timer). These two were slightly more cooked than mine, but still had runny yolks. My older sister and my little brother each had one. My little brother said it was okay, but he actually prefers a solid yolk. Next I poached two more eggs for my younger sister. She really liked them, but then again, she loves eggs in general. After hers were done, I offered to try poaching one more for my brother, this time with a solid yolk. I let it cook for close to 6 minutes, and when he cut into the yolk, it was solid almost all the way through, with a slightly soft--but definitely not runny--center. Finally, I poached an egg for my mom. In an effort to end up with minimal cooked yolk, I only let the egg cook for 2 1/2 minutes. She said it still have a layer of cooked yolk, though, so next time I might try only 2 minutes of cooking time.
All in all, I would say today's eggy experience was a success! I can't wait to try making Eggs Benedict with my new egg-poaching skills, and it will give me a chance to attempt a hollandaise sauce, as well.

Tuesday, June 26, 2012
Soufflé!
Today I made a souffle for lunch. I found the recipe in a Kraft Food & Family magazine. I decided to use this recipe because it looked relatively foolproof. Even so, separating the eggs was one of the most stressful experiences in my cooking career--I was petrified that one of the yolks would break into the whites and the whole thing would be ruined. In the end, I only ended up dropping one yolk into the whites, but it did not break, so I carefully scooped it up and placed it into the bowl of yolks. I had found some tips online for making souffles, and they said that separating eggs is easier when they are cold, but that they whip up better when they are at room temperature. I left the separated eggs on the counter along with the cream cheese so everything could come to room temperature.


Using a hand mixer, I beat the egg whites until they reached stiff peaks. At least I think they were stiff peaks, but I've not really done much with beaten egg whites, so I'm not certain. The egg white foam seemed to stand up when I pulled the beaters out, so I called them done.


Then I used the same beaters (I saw no reason to bother cleaning them off first) to beat the softened chive-and-onion cream cheese with the egg yolks. Next I added the egg white foam to the bowl with the yolk/cream cheese mixture and, using a rubber spatula, carefully folded the two mixtures together. I'm not certain if I mixed too much or not enough. I was afraid to over-mix and deflate the egg white, but I was also afraid that I had not mixed it well enough, as there were still some small clumps of egg white visible in the mixture. I'll have to experiment a bit more with egg whites until I become comfortable working with them. Anyway, my mom found me a baking dish with relatively straight sides and she sprayed it with cooking spray for me (I certainly know how to do this myself, but when given the chance, I prefer not to; I tend to make a bit of a mess with cooking spray). Gently, I poured the fluffy, eggy mixture into the prepared pan and popped it in the oven.

At this point, I began steaming some green beans to go with the souffle. I thought a green vegetable would look pretty on the plate next to a golden brown serving of souffle, so my mom bought some fresh green beans while she was out this morning. A side note entirely unrelated to souffle: I have decided that I really enjoy my fresh vegetables when they are steamed.
The souffle did not appear to puff up very much in the oven, but when I pulled it out to check on it, the top was rounded and golden brown. It still seemed slightly jiggly, so I put it back in the oven for about 2 minutes before calling it done. As I waited for the green beans to finish steaming (they took longer than planned), the souffle sat on the counter. The recipe said that this souffle held up well after being removed from the oven, and this note was confirmed by my souffle, which only sank slightly as it waited for its vegetable accompaniment.

My younger sister had a friend over for lunch today, but since my dad was at work and my older sister was out with a friend, there were only five of us at home for lunch. The souffle served the five of us comfortably for lunch, but I think it would be a stretch for it to serve more than five hungry people for dinner. I dished the souffle up from the edges first, and I'm glad I did, because the middle was just slightly underdone. Next time, I will bake the souffle just a couple minutes longer to ensure that the center is cooked. Having never really eaten a souffle before, I wasn't entirely sure what to expect as far as texture is concerned, but I was pleasantly surprised to find that the souffle had a texture and flavor similar to an extremely fluffy omelette.

Now that I've tried it once, I would be happy to make another souffle. I'd like to try my hand at making one completely from scratch, and I think I would like to make a dessert one. But I have a feeling that it will be quite a while before I recover from my egg-separating experience enough to make another souffle. ;)
I was also thinking about the recipe I used and the fact that it uses cream cheese as the base. My thought was that, in theory, any flavor of cream cheese would work in this souffle recipe. I thought I'd like to try it with another flavor of cream cheese, possibly a sweet one, and see if it works. Then I remembered the tubs of salmon-flavored cream cheese I've seen at the store and I had a light bulb moment. Salmon and eggs go beautifully together, so why not make this souffle with the salmon-flavored cream cheese? I really think my dad would enjoy it, too. I may have to make a lot more souffles in the near future...

Easiest Soufflé Ever
found in the spring 2012 issue of Food & Family magazine
Ingredients:
6 eggs, separated
1 tub (8 oz.) chive and onion cream cheese spread
Instructions:
Heat the oven to 375°F.
Beat egg whites in medium bowl with mixer on high speed until stiff peaks form. Beat cream cheese spread in large bowl with the mixer until creamy. Add egg yolks; beat until well blended. Gently stir in egg whites until well blended.
Pour into 1 1/2-quart baking dish sprayed with cooking spray.
Bake 24 to 26 minutes or until top is puffed and golden brown.
Note: In addition to a simple recipe preparation, this souffle holds beautifully on the table until ready to serve.
_________________________________________________________
Special thanks to Mommy for all the help and for taking pictures of the process for me! :)
Friday, June 1, 2012
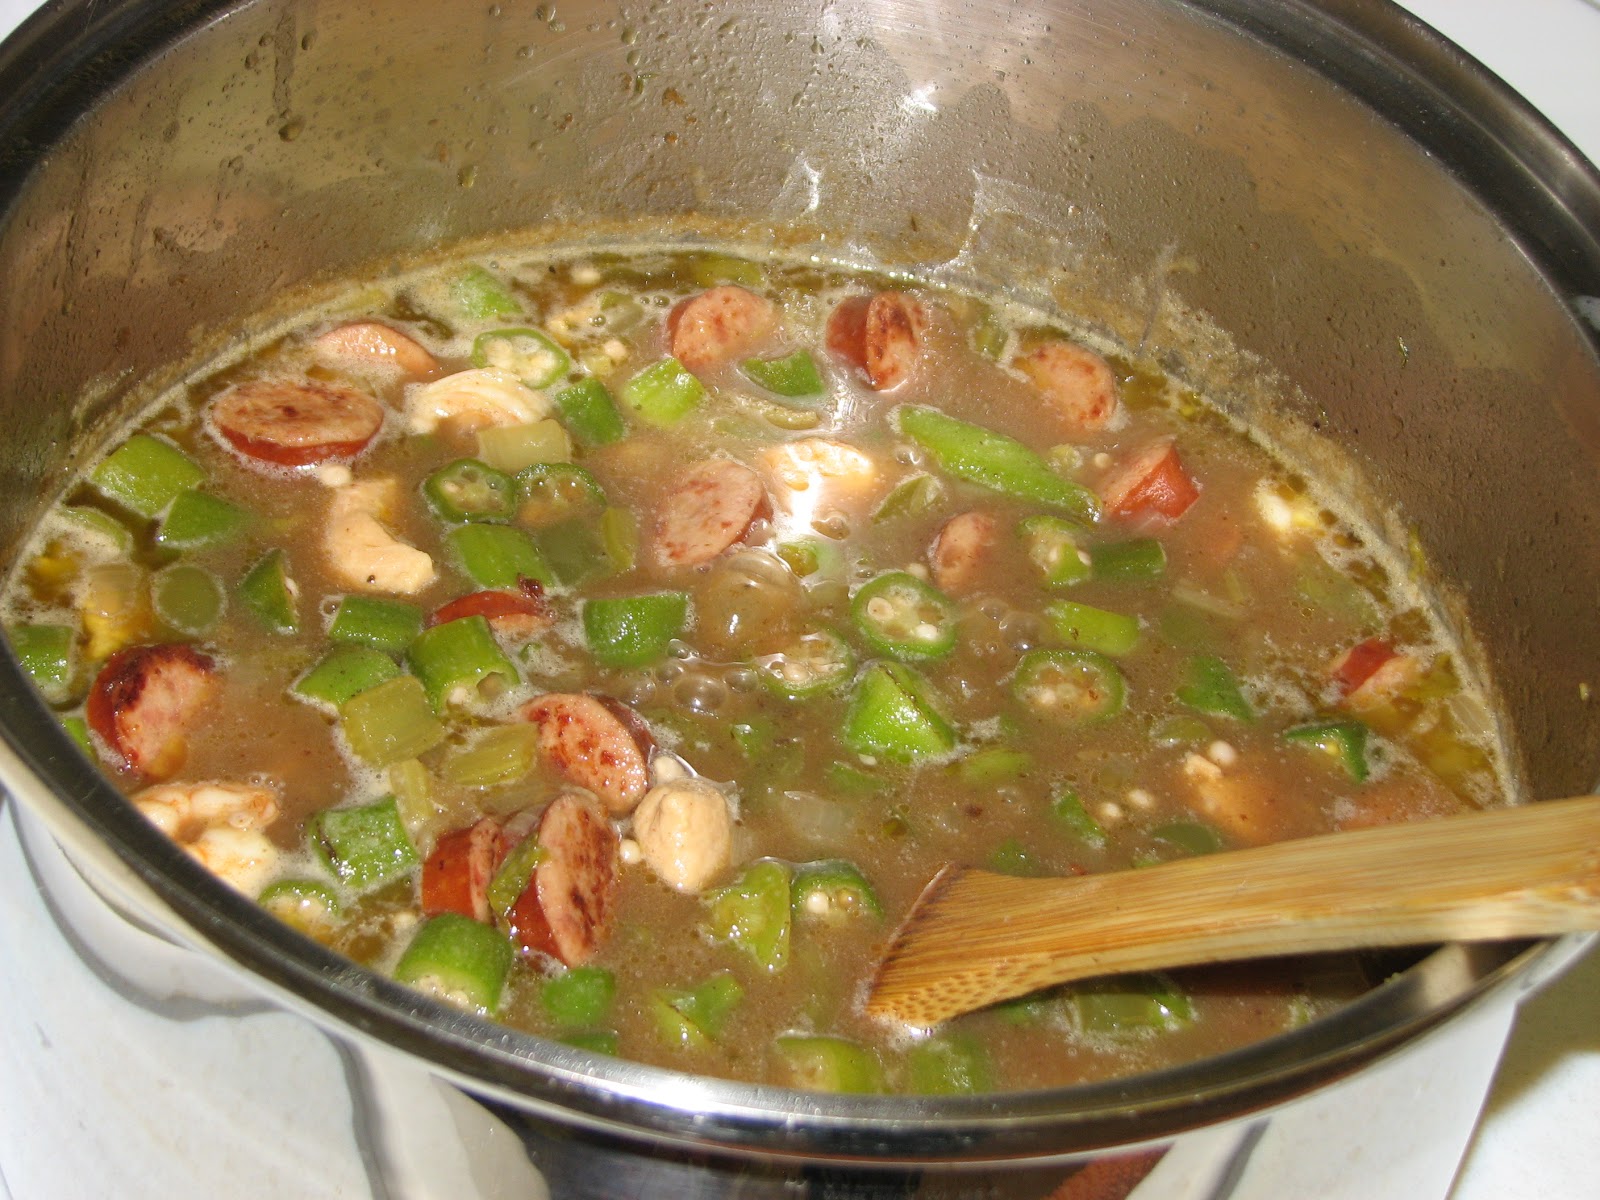
Lazy Day Gumbo
Last night I made gumbo for dinner. The recipe said it served 12 to 14 people, but there was absolutely none left after the five of us ate. That just goes to show how amazingly delicious this pot of gumbo was! The recipe I used is from my Nanna, but I don't know where she got it from to begin with. One thing I found interesting about this recipe for gumbo is that it says to make the roux in the microwave. I'd never heard of doing it that way before, but I also had never really made a roux at all before. I was a little skeptical, but it worked! The recipe called for peanut oil, but Mommy said that Nanna has used canola oil, so I made the roux with canola oil instead. I used frozen okra and frozen shrimp for the gumbo. I thawed the shrimp before adding them, but I added the okra straight from the freezer. Nanna always doubles the amount of okra in her gumbo, so I did, too: I used 20 oz. instead of 10 oz. Also, I thought we had dried thyme, but I could not find it when it was time to add it to the pot, so I used fresh thyme instead. For the chicken broth, I used 5 1/2 teaspoons of chicken base plus 5 1/2 cups of hot water, because we don't usually keep chicken broth on hand.
One more thing: At the bottom of the recipe is a note stating that Nanna adds some gumbo filé when she is putting in the other spices. Daddy searched the grocery store and bought me some, and I had every intention of adding it...but I had put it away in our spice rack and forgotten about it...so, our gumbo didn't have any filé in it. Which just means I'll have to make it again. What a sacrifice it will be for my family to have to eat more gumbo another day! ;)


Lazy Day Gumbo
From my Nanna
Ingredients:
1 pound fully cooked smoked sausage, cut into 3/4 inch slices [I used Polka Kielbasa, because that's what Daddy likes!]
1/2 cup peanut oil [or canola oil]
1/2 cup all-purpose flour
2 medium onions, chopped
2 medium green bell peppers, chopped
1 cup chopped celery
2 [or more] cloves garlic, minced
1 teaspoon salt
1/2 teaspoon ground black pepper
1/2 teaspoon ground red pepper
1/2 teaspoon dried thyme leaves [I used about 6 sprigs of fresh thyme]
1/4 teaspoon dried oregano leaves
5 1/2 cups chicken broth [or 5 1/2 teaspoons chicken base + 5 1/2 cups hot water]
1 bay leaf
1 1/2 cups diced chicken [I used chicken tenders but I'm sure any kind of chicken would be fine]
1 1/2 cups fresh okra, or 1 10-ounce package frozen okra [Nanna always doubles this amount, so I did, too. Use cut okra, not whole.]
1 pound peeled, de-veined medium shrimp [thawed from frozen works fine here]
6 cups hot cooked rice
Instructions:
Cook sausage in large, heavy saucepan over medium-high heat 4 to 5 minutes. Remove sausage; drain fat. Set aside.
Combine oil and flour in 2-cup glass measure. Microwave on high 5 minutes; stir with a small wire whisk. [It will look funny when you take it out of the microwave--almost like a sponge or something--but don't panic. Just stir it with a whisk and it will look fine.] Continue to cook at 30-second intervals, stirring after each interval until roux is dark red-brown. [Mine seemed dark red-brown to me after the first 5 minutes. Yours may take longer, depending on your microwave.] Pour roux into heavy saucepan; add onions, green peppers, celery, garlic, salt, black pepper, red pepper, thyme, and oregano.
Cook, stirring, 3 to 4 minutes, or until vegetables are tender. Add broth and bay leaf; bring to a boil. Add reserved sausage and chicken; reduce heat and simmer 20 minutes. Add okra; simmer 10 minutes. Add shrimp; simmer 5 minutes. Remove bay leaf. Spoon rice and gumbo into serving bowls.
Yield: 12 to 14 servings [whoever wrote this yield has never met my gumbo-loving family--this only served the five of us!]
Tuesday, May 29, 2012
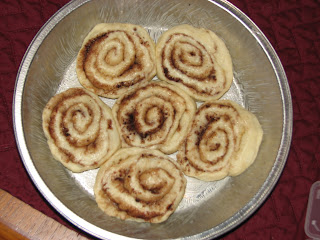
Cinnamon Rolls
Yeast dough has always been one of my kitchen fears, but I finally decided to conquer this fear (with a little help from Daddy) by making cinnamon rolls. The whole process was not nearly as scary as I thought it was going to be. I probably would have ruined the whole batch, though, if Daddy hadn't been there to stop me from dumping the yeast into a bowl of hot milk. All the poor, defenseless yeasties would have been killed! Thankfully, Daddy told me to monitor the temperature of the scalded milk. Once it was below 100 degrees F, I added the packet of yeast, and from that point onward, the dough-making went quite smoothly. I made the dough and stashed it in the refrigerator last night, so that I wouldn't have to wake up at 4:00 A.M. in order to have hot, fresh cinnamon rolls for breakfast. Mommy woke me up at 7:00 this morning and I got to work rolling out the dough, spreading it with melted butter, and sprinkling on the sugar and cinnamon. Then I began to roll the dough into a log. This morning's efforts are where I met with some difficulties, including, but not limited to, the following:
FLAVOR: These cinnamon rolls were amazing! They were sweet, soft, cinnamon-y, and positively dripping with icing. The icing contains maple flavoring and brewed coffee, but neither flavor is really prominent. They just meld together and create a perfect complement to the cinnamon rolls.
APPEARANCE/TEXTURE: The cinnamon rolls may not have been as pretty as the ones from a refrigerated Pillsbury can, but I still thought they looked mouthwatering. I also think that they had a much better texture than canned cinnamon rolls. The dough was pillowy soft and melt-in-the-mouth tender, and each roll had a slightly crunchy, caramelized-sugar bottom that provided beautiful contrast to the gooey butter-cinnamon-sugar interior and the sweet, melted icing.
OTHER NOTES/COMMENTS: These are definitely not everyday breakfast material! The rolls take a fair amount of effort and quite a lot of time to make, but I think I would make them again for a special occasion or a holiday.
FAMILY MEMBER REVIEWS
Gabriel: "They were good, I liked the icing. I'd probably give them four stars."
Anne Marie: They were very good and I liked the icing a lot better than the stuff from a Pillsbury can.
Elizabeth: I liked the glaze a lot. It was nice because it had more flavor than just powdered sugar and milk. The rolls were good. I was expecting there to be more bread to filling. The ratio of bread to filling wasn't bad, it just wasn't what I was expecting. They were really yummy and you can make them again.
Mommy: They were tasty. I liked the coffee and maple in the icing. I would prefer a taller cinnamon roll and a thicker layer of dough. You can definitely make them again.
Daddy: This evening after dinner, Daddy tried one of the cinnamon rolls rewarmed in the microwave. He said it was good and he said that next time I make them, he wants to try one without the glaze because he thinks they'd be really yummy without it.


Cinnamon Rolls
I used the measurements for half a batch of Pioneer Woman's cinnamon roll recipe. The original recipe can be found here, but I used some of the measurements and instructions found here (because I was too lazy to calculate half the recipe myself). I did refer to the original while making the cinnamon rolls. So, this is slightly adapted from both Pioneer Woman and Mommy's Kitchen.
Ingredients for Cinnamon Rolls:
2 cups whole milk
1/2 cup vegetable oil
1/2 cup sugar
1 package active dry yeast
4 cups (plus 1/2 cup extra, separated) all-purpose flour
1/2 teaspoon (heaping) baking powder
1/2 teaspoon (scant) baking soda
1/2 tablespoon (heaping) salt
1 to 2 sticks melted butter [I used 1 1/2 sticks of butter]
1 cup granulated sugar
Generous sprinkling of cinnamon [I must have used at least two tablespoons.]
Ingredients for Icing:
16 oz. powdered sugar
1 teaspoon maple flavoring
1/4 cup milk
2 tablespoons melted butter
2 tablespoons brewed coffee [Mommy made a mug of instant coffee for me. I just used 2 tablespoons of it and gave the rest to my coffee-loving little brother.]
1/8 teaspoon salt
Instructions:
Place the milk, vegetable oil, and sugar in a pan and mix together. Scald this mixture (which means to bring it almost to a boil and then take it off the heat), then set aside to cool for 45 minutes to 1 hour [I placed mine in a large mixing bowl to cool. It took closer to 1 1/2 hours for the temperature to drop below 100 degrees F.]. When the mixture is still warm but not hot, sprinkle in the packet of yeast and let it sit for 1 minute. Then add the 4 cups of flour and stir it together. Cover the bowl with a damp kitchen towel and let it rise in a warm place for at least 1 hour [Mine ended up rising for close to 2 hours and it was fine.]. After the dough has risen, add the extra 1/2 cup of flour, the baking powder, baking soda, and salt, and stir together until mixed. [At this point, I transferred the dough to a greased bowl, covered it with plastic wrap, and stored in the refrigerator overnight.]
Sprinkle your rolling surface [a very large counter is best] generously with flour and place the dough in the center, forming it into a long rectangular shape. Roll out the dough into a large rectangle about 10 inches by 30 inches [I would actually suggest not rolling the dough out this much, as I think that thicker dough would be easier to work with and would yield nicer rolls.]. Pour 1 to 2 melted sticks of butter over the surface of the dough and spread it out evenly using a pastry brush. Evenly sprinkle the sugar over the whole surface of the butter-covered dough, then generously sprinkle with cinnamon. Starting from the long edge farthest from you, begin to tightly and neatly roll the dough into a log. When you reach the end, firmly pinch the seam to seal the roll closed. Prepare three round foil pie tins by spreading each with melted or softened butter. Slice the dough log into 3/4 to 1 inch rolls and place the rolls into the prepared pie tins. [I followed these directions, but if I made these again I would do things differently. To begin with, I would have cut the rolls thicker (more like 1 1/2 inches). I also would have either prepared more pans (it took 6 pans to hold all my cinnamon rolls) or placed the rolls closer together in the pan.] Cover the pans with a kitchen towel and let the cinnamon rolls rise for 20 to 30 minutes. [This is a good time to preheat the oven.] Bake the cinnamon rolls at 375 degrees F for 15 to 18 minutes, until they are light golden brown. [I baked two pans of rolls at a time and mine took about 17 minutes. If the rolls had all fit in only three pans, I would have baked them all at once.]
While the rolls are baking, prepare the icing: in a large bowl, mix together all of the icing ingredients with a whisk until smooth, thick, and pourable. As soon as the rolls come out of the oven, liberally drizzle them with icing, making sure to get icing around the edges of the rolls as well as all over their tops. [Don't be afraid to lay it on thick!]
[These cinnamon rolls are delicious fresh from the oven, but if they've cooled off, you can microwave one on a plate for 10 seconds or so. I believe they're probably also amazing at room temperature.]
- A not-quite-big-enough counter (I had to move the food processor out of the way, and I only just had enough space after that)
- Dough that did not want to roll tightly into a log (this caused problems when I began trying to slice the individual cinnamon rolls--they all started unraveling, and I had to unseal the log and re-roll it more securely)
- A lack of easily-accessible floss for cutting the rolls (there was plenty of mint-flavored, but I didn't think that would taste very good with the cinnamon, so I used a serrated knife)
- More cinnamon rolls than prepared pie tins (maybe I should have put more in each pan, but I didn't want to crowd them)
FLAVOR: These cinnamon rolls were amazing! They were sweet, soft, cinnamon-y, and positively dripping with icing. The icing contains maple flavoring and brewed coffee, but neither flavor is really prominent. They just meld together and create a perfect complement to the cinnamon rolls.
APPEARANCE/TEXTURE: The cinnamon rolls may not have been as pretty as the ones from a refrigerated Pillsbury can, but I still thought they looked mouthwatering. I also think that they had a much better texture than canned cinnamon rolls. The dough was pillowy soft and melt-in-the-mouth tender, and each roll had a slightly crunchy, caramelized-sugar bottom that provided beautiful contrast to the gooey butter-cinnamon-sugar interior and the sweet, melted icing.
OTHER NOTES/COMMENTS: These are definitely not everyday breakfast material! The rolls take a fair amount of effort and quite a lot of time to make, but I think I would make them again for a special occasion or a holiday.
FAMILY MEMBER REVIEWS
Gabriel: "They were good, I liked the icing. I'd probably give them four stars."
Anne Marie: They were very good and I liked the icing a lot better than the stuff from a Pillsbury can.
Elizabeth: I liked the glaze a lot. It was nice because it had more flavor than just powdered sugar and milk. The rolls were good. I was expecting there to be more bread to filling. The ratio of bread to filling wasn't bad, it just wasn't what I was expecting. They were really yummy and you can make them again.
Mommy: They were tasty. I liked the coffee and maple in the icing. I would prefer a taller cinnamon roll and a thicker layer of dough. You can definitely make them again.
Daddy: This evening after dinner, Daddy tried one of the cinnamon rolls rewarmed in the microwave. He said it was good and he said that next time I make them, he wants to try one without the glaze because he thinks they'd be really yummy without it.


Cinnamon Rolls
I used the measurements for half a batch of Pioneer Woman's cinnamon roll recipe. The original recipe can be found here, but I used some of the measurements and instructions found here (because I was too lazy to calculate half the recipe myself). I did refer to the original while making the cinnamon rolls. So, this is slightly adapted from both Pioneer Woman and Mommy's Kitchen.
Ingredients for Cinnamon Rolls:
2 cups whole milk
1/2 cup vegetable oil
1/2 cup sugar
1 package active dry yeast
4 cups (plus 1/2 cup extra, separated) all-purpose flour
1/2 teaspoon (heaping) baking powder
1/2 teaspoon (scant) baking soda
1/2 tablespoon (heaping) salt
1 to 2 sticks melted butter [I used 1 1/2 sticks of butter]
1 cup granulated sugar
Generous sprinkling of cinnamon [I must have used at least two tablespoons.]
Ingredients for Icing:
16 oz. powdered sugar
1 teaspoon maple flavoring
1/4 cup milk
2 tablespoons melted butter
2 tablespoons brewed coffee [Mommy made a mug of instant coffee for me. I just used 2 tablespoons of it and gave the rest to my coffee-loving little brother.]
1/8 teaspoon salt
Instructions:
Place the milk, vegetable oil, and sugar in a pan and mix together. Scald this mixture (which means to bring it almost to a boil and then take it off the heat), then set aside to cool for 45 minutes to 1 hour [I placed mine in a large mixing bowl to cool. It took closer to 1 1/2 hours for the temperature to drop below 100 degrees F.]. When the mixture is still warm but not hot, sprinkle in the packet of yeast and let it sit for 1 minute. Then add the 4 cups of flour and stir it together. Cover the bowl with a damp kitchen towel and let it rise in a warm place for at least 1 hour [Mine ended up rising for close to 2 hours and it was fine.]. After the dough has risen, add the extra 1/2 cup of flour, the baking powder, baking soda, and salt, and stir together until mixed. [At this point, I transferred the dough to a greased bowl, covered it with plastic wrap, and stored in the refrigerator overnight.]
Sprinkle your rolling surface [a very large counter is best] generously with flour and place the dough in the center, forming it into a long rectangular shape. Roll out the dough into a large rectangle about 10 inches by 30 inches [I would actually suggest not rolling the dough out this much, as I think that thicker dough would be easier to work with and would yield nicer rolls.]. Pour 1 to 2 melted sticks of butter over the surface of the dough and spread it out evenly using a pastry brush. Evenly sprinkle the sugar over the whole surface of the butter-covered dough, then generously sprinkle with cinnamon. Starting from the long edge farthest from you, begin to tightly and neatly roll the dough into a log. When you reach the end, firmly pinch the seam to seal the roll closed. Prepare three round foil pie tins by spreading each with melted or softened butter. Slice the dough log into 3/4 to 1 inch rolls and place the rolls into the prepared pie tins. [I followed these directions, but if I made these again I would do things differently. To begin with, I would have cut the rolls thicker (more like 1 1/2 inches). I also would have either prepared more pans (it took 6 pans to hold all my cinnamon rolls) or placed the rolls closer together in the pan.] Cover the pans with a kitchen towel and let the cinnamon rolls rise for 20 to 30 minutes. [This is a good time to preheat the oven.] Bake the cinnamon rolls at 375 degrees F for 15 to 18 minutes, until they are light golden brown. [I baked two pans of rolls at a time and mine took about 17 minutes. If the rolls had all fit in only three pans, I would have baked them all at once.]
While the rolls are baking, prepare the icing: in a large bowl, mix together all of the icing ingredients with a whisk until smooth, thick, and pourable. As soon as the rolls come out of the oven, liberally drizzle them with icing, making sure to get icing around the edges of the rolls as well as all over their tops. [Don't be afraid to lay it on thick!]
[These cinnamon rolls are delicious fresh from the oven, but if they've cooled off, you can microwave one on a plate for 10 seconds or so. I believe they're probably also amazing at room temperature.]
Friday, May 25, 2012
Pumkin Pie Yogurt Pops
It was way too hot to think about turning on the oven, and I hadn't even been outside the house this afternoon. To remedy the situation, my older sister and I had the brilliant idea of making pumpkin pie yogurt pops. We searched online for a recipe, but none of them were really calling out to us, so we decided to wing it. To begin with, we whisked together plain Greek yogurt, about half a can of pumpkin puree, and some brown sugar. Then we tasted the mixture and added some spices and a little more brown sugar. After mixing, we tasted it again and thought it needed more pumpkin, so we dumped in the other half of the can of pumpkin. Again, we mixed and tasted. Then Elizabeth had a light bulb moment and thought of adding vanilla extract. After this addition, we finally deemed the mixture perfect. Since we didn't use a recipe and we didn't really measure anything, the amounts listed are estimates. Just mix it all together until it tastes right! :)
Pumpkin Pie Yogurt Pops
2 cups plain Greek yogurt
1 (15 oz.) can pumpkin puree
1/3 to 1/2 cup packed brown sugar
1 teaspoon vanilla extract
Ground cinnamon, allspice, nutmeg (freshly grated is best), and ginger to taste
Place all ingredients in a large bowl and mix, using a whisk, until well combined. Dip a spoon (or your finger) into the bowl and taste the mixture. Add more spices if needed. Place 8 small paper cups (we used the wax-coated kitchen sized ones) in a 9x13-inch pan. Spoon or pour the pumpkin mixture evenly into the cups. Loosely cover the pan with plastic wrap and place in the freezer for about 1 hour. Remove the pan from the freezer, take off the plastic wrap, and insert a popsicle stick into the center of each cup of partially-frozen pumpkin mixture. Replace the plastic wrap and return the pops to the freezer until completely frozen, about 5 hours. Remove the pumpkin pie yogurt pops from the paper cups before eating. :)
Makes 8 Pumpkin Pie Yogurt Pops.
Sunday, May 20, 2012
Broccoli Tofu Stir-Fry
On Friday night I made a broccoli and tofu stir-fry for dinner. This was my first experience with stir-frying as well as with tofu, and I was quite impressed with both. I really enjoyed both the taste and the texture of the tofu in this dish. The preparation part of the recipe took me a while, because I'm a very meticulous slicer/dicer/chopper/measurer, but the stir-frying part went very quickly and smoothly. I would definitely make this recipe again, because everyone enjoyed it (I doubled the recipe, and the six of us demolished every last bit of it) and it was so simple to put together. If you used pre-cut broccoli florets, the preparation would be even easier. I didn't measure my broccoli for this recipe. Since I doubled it, I should have used four cups, but I just cut up three broccoli crowns and called it a night. My family loves broccoli, so it wasn't an issue if there was a bit too much, and the doubled amount of sauce perfectly coated all of the tofu and broccoli. The only thing I did not double in the recipe was the amount of water added to the pan with the broccoli and garlic--my mom said it was just to steam the vegetables and it wasn't necessary to add twice as much water.
My apologies for the lack of pictures; it was a very late night, everyone was hungry, and I completely forgot to grab the camera when it was all finished.
TASTE: I had never cooked with oyster sauce before, so I wasn't sure what to expect, but I think the oyster sauce really made this dish amazing. It has a slightly briny flavor that really added something special to the stir-fry. The sesame oil also gave the stir-fry that characteristic Asian flavor. I absolutely loved the flavor of the sauce and I think it went perfectly with the tofu and broccoli.
TEXTURE/APPEARANCE: My little brother loved the tofu, and he said that it had the same texture of scallops. I thought the texture was similar to that of scrambled eggs, and the flavor was much more pleasing to me than I had expected. The sauce evenly coated the bright green broccoli and golden-brown cubes of tofu, giving everything a delicious dark brown sheen.
ADDITIONAL COMMENTS/NOTES: As this was my first time working with tofu, I looked online for instructions on how to drain it. I sort of combined all the ways of draining it I could find. First, I placed a block of tofu on a large dinner plate. Then I folded up a piece of paper towel, placed it on top of the tofu, and placed another dinner plate on top. I repeated this process for the other block of tofu, since I doubled the recipe. I was going to use two large cans of tomatoes to weigh each plate down, but they wouldn't fit on our dinner plates, so my dad once again came to my rescue and brought out two 2-pound weights from my mom's adjustable dumbbells. I used one 2-pound weight for each block of tofu. I let the tofu sit and drain for a little more than an hour before I cut it into half-inch cubes, and it held together fine, but I think if I'd had time to let it drain longer (maybe two hours?) it would have been less fragile. I recommend draining your tofu for at least an hour before cutting it up. Just be sure that you don't put too much weight on the top plate--you don't want to squash your tofu to death!
Broccoli-Tofu Stir-Fry
Adapted from Cooking Light, December 2001; Accessed at MyRecipes.com: http://www.myrecipes.com/recipe/broccoli-tofu-stir-fry-10000000356664/
Ingredients:
3 cups instant brown rice
1/4 cup soy sauce
1/4 cup oyster sauce
5 teaspoons cornstarch
4 teaspoons rice vinegar
4 teaspoons sesame oil
2-3 teaspoons vegetable oil
2 pounds firm tofu, drained and cut into 1/2-inch cubes
1/2 teaspoon salt
3 broccoli crowns, cut into florets
3/4 cup water
3-4 tablespoons minced garlic
Instructions:
Using a whisk, combine the soy sauce, oyster sauce, cornstarch, rice vinegar, and sesame oil in a small bowl and set aside.
Prepare the rice according the the package directions.
In a large nonstick skillet over medium-high heat, heat the vegetable oil. Add the tofu cubes to the pan, sprinkle with salt, and cook, tossing frequently, for 8-10 minutes, until the tofu cubes are golden brown. Remove the tofu from the pan and keep warm. Add the broccoli, water, and garlic to the pan. Cover the pan and cook, stirring occasionally, until crisp-tender, about 4-6 minutes. Uncover the pan and add the sauce mixture and tofu. Stir gently to coat. Cook, stirring occasionally, for 2 minutes or until the sauce thickens. Serve the stir-fry over the rice.
Serves 6.
Thursday, May 17, 2012
Creamy Lemon Blueberry Crepes
I've always wanted to try my hand at making crepes, but I was afraid they would be really difficult to make. Was I ever wrong! If you mix your batter in the blender, the hardest part of making crepes is swirling the batter in the pan. The crepes cooked super quickly in my nonstick skillet, even when I turned the stove burner to medium-low. Next time I make crepes (and there will definitely be a next time!), I would like to try using a regular (non-nonstick) pan, and I'd like to try a savory version.
I made the crepes yesterday afternoon, let them cool, stacked them between wax paper, and put them in a plastic ziplock bag in the fridge. My crepes were not as thin as I had always expected crepes to be, but at least they were mostly round(ish). It took a couple tries for me to get the hang of swirling the batter in the pan, but once I got it, the process of cooking the crepes went smoothly. I made two batches of crepes, just to be certain there would be enough for my hungry siblings and me. The recipe I used said it yielded about ten crepes, but I only ended up with seven or eight per batch. I may have used too much batter per crepe, but I found that if I didn't pour enough batter in the pan, there wasn't enough batter to swirl around. I would like to try making crepes again and see if I can make them thinner and more tender.
I also prepared the lemon curd cream and the blueberry sauce ahead of time and stored them in the refrigerator. For breakfast this morning, all I had to do was warm the crepes over medium-low heat in a skillet, microwave the blueberries, and assemble everything.


FLAVOR: The crepes themselves were slightly sweet and smelled of vanilla, and the flavor of the egg was prominent. They almost tasted like french toast. While delicious, the blueberry sauce and the lemon curd cream were very sweet. Mommy commented that they would not be out of place as a dessert. If I made these for breakfast again, I would increase the cream cheese and decrease the sugar in the blueberry sauce. Altogether, though, I really enjoyed the flavor of this crepe dish.
TEXTURE/APPEARANCE: The texture of the crepes was very different from how I expected them to be. They were almost tough, for lack of a better word, and a knife was required to cut them. Some of the crepes were prettier than others. :) I found that one side always browned more than the other. I just picked the nicer-looking side to go on the outside of the rolled crepes. The powdered sugar on top made these look really elegant and fancy, and I loved the way the pale lemony filling looked next to the deep purple blueberry sauce.
ADDITIONAL COMMENTS/NOTES: Elizabeth and I both think that the blueberry sauce would be excellent on cheesecake (which is another thing I would like to try making). I found that our tortilla warmer was perfect for holding the crepes as I rewarmed them this morning.
FAMILY MEMBER REVIEWS:
Gabriel: "I think that they were the bests crepes that I have ever had, even though I have never had crepes before this. I like crepes. They're delicious."
Anne Marie: "I liked how the lemons blended with the blueberries so well, and then you have the soft sweet flavor of the crepe and it all kind of blended together and it was very good."
Elizabeth: Taste was superb but the texture was not as I imagined crepes to be. They were almost tough, not delicate like I thought they would be.
Mommy: I would like to eat them again but I would prefer them for dessert, because I don't really like sweet things for breakfast. I do like the sweet and the tart.
Daddy: Daddy was not available for recipe testing this morning (he was at work).


Creamy Lemon Blueberry Crepes
From Picky Palate, with my comments/changes in brackets.
http://picky-palate.com/2012/05/09/creamy-lemon-blueberry-crepes/
Ingredients:
3/4 cup all-purpose flour
2 tablespoons granulated sugar
1/2 cup milk
1 egg
1/4 teaspoon pure vanilla extract
1 tablespoon melted butter [I did not add this to my first batch of crepes because I didn't see it in the ingredients list, and the recipe never said to add it. I realized this as I made the second batch, so I did add a tablespoon of melted butter to the second batch of crepes. No difference between the batches was evident to me.]
1 cup frozen blueberries
1/4 cup plus 1 tablespoon granulated sugar [I think I would try this with slightly less sugar if I made it again. The blueberry sauce was good, but very sweet.]
1 1/2 tablespoon cornstarch
1/2 tablespoon lemon juice
1/2 cup prepared lemon curd
3 tablespoons softened cream cheese [If I made this recipe again, I would use a higher ratio of cream cheese to lemon curd--maybe equal parts lemon curd and cream cheese.]
Instructions:
1. Place flour, sugar, milk, egg and vanilla [and melted butter, if you remember to add it :) ] into a blender, blending until well combined, about 20 seconds. Pour crepe batter into a large measuring cup and set aside. [I did an internet search for crepe-making tips, and many websites said to let crepe batter rest for an hour, so I put my batter in the fridge for an hour before cooking the crepes. For the second batch, I just left the batter sitting on the counter for about 15-20 minutes before cooking the crepes. I did not notice any difference between the two batches.]
2. Place blueberries, sugar, cornstarch and lemon juice into a medium bowl, mixing to combine. [I just mixed everything right in the saucepan. Can you tell I do the dishes around here? ;) ] Transfer to a medium saucepan over medium low heat. Stir and cook for 5 minutes, until bubbly. [This step took more than five minutes. I think with fresh blueberries, 5 minutes would be spot on, but mine were frozen so it took a few extra minutes.] Remove from heat and set aside.
3. Place lemon curd and cream cheese into a small bowl, mixing until smooth and combined. [I do not think I let my cream cheese soften enough, because the mixture would not become smooth. It tasted fine, though, so I just left it with the tiny cream cheese lumps.]
4. Heat a crepe pan or 12 inch non stick over medium heat. [I used a 10-inch nonstick skillet. I started out with the stove burner on medium heat, but ended up turning it down to medium-low, and I think I could have turned it down even more.] Spray lightly with cooking spray. [I switched between spraying the pan with cooking spray and dropping in a little butter. Sometimes I didn't grease the pan at all. I would need to experiment more to decide which method I like the best.] Pour 2-3 tablespoons of crepe batter into pan swirling all the way around to get a nice circular crepe. Cook for about 1 minute on the first side or until turning golden then flip and cook for another 30 seconds-1 minute. [Mine never took a full minute on either side.] Transfer to a paper towel lined plate. Continue cooking crepes until all the batter is gone. Makes about 10 crepes. [I got seven from the first batch and eight from the second batch.]
5. Fill each crepe with a thin layer of lemon curd cream and a spoon of blueberries. Roll crepes and sprinkle with powdered sugar. Now eat!
Makes about 10 crepes [I got 15 crepes from two batches, and there was plenty of lemon curd cream and just enough blueberry sauce for all of them without doubling the filling ingredients.]
Subscribe to:
Posts (Atom)